
![]()
By The Apache Software Foundation - From File:ASF-logo (2016).svg, edited in Inkscape: rotated to match the design of File:Apache HTTP server logo (2016).png and some cleanup; optimised using Scour., Apache License 2.0, https://commons.wikimedia.org/w/index.php?curid=47190352
Ever wonder, how to make the urls of your exposed API looks cleaner or user friendly. Or ever wonder how to manipulate the url so that calling a specific url would redirect to another url, or invoke an internal proxy fetch.
One of the solution is the Apache Module mod_rewrite. This module is provided by Apache in the Apache Http Server.This module provides a way to manipulate URLs using an unlimited number of rules. It allows to rewrite URL based on server variables, environment variables, Http headers, or time stamps.
In this guide, we are going to create simple rules to redirect to the index.html any user trying to access to a “Not Found” page.
This is a pretty simple tutorial to understand the basics of the logic behind the Apache Module mod_rewrite.
Let`s begin!
1-Enable mod_rewrite module
Enable the mod_rewrite module using the a2enmod command.
$ sudo a2enmod rewrite |
Then restart your the Apache Http server.
$ sudo systemctl restart apache2 |
Ok, that was step 1! Next!
2-VirtualHost context or Per-directory context
There are two ways to setup the rules:
- In
VirtualHost context, where the rules will be written in the configuration file which contains the virtualhost configuration. - In
Per-directory context, where the rules will be written in a configuration file named.htaccessand which will be located in your website or web application directory in/var/www.
Here we will do it using the Per-directory context.
By default, Apache Http Server does not allow it.
So, lets tell to our Apache Http Server to allow it.
From that point, we shall consider/var/www/toto` as the directory containing your web application or website.
In the virtual host configuration file of toto.com, add the following in the VirtualHost containers at the end:
<Directory /var/www/toto> |
The <Directory> directive enclose a group of directives that apply only to the named file-system directory, sub-directories and their contents. For example, here, the directive between <Directory> and </Directory> will be applied only on /var/www/toto. More about the directive here.
Options is a directive to configure what fearures are available in a particular directory
The features available for our directory /var/www/toto are:
FollowSymLinksis a feature that enable to follow symboblic links in the mentionned directoryIndexesif a url which maps to a directory is requested and there is no DirectoryIndex(e.g. index.html) in that directory, then mod_autoindex will return a formatted listing of the directory.MultiViewsContent negotiated “MultiViews” are allowed using mod_negotiation.- More information about the other features here.
AllowOverride enable to configure the types of directives that are allowed in .htaccess files. The directive can be set to None, All or direclty specifying the directive type. When set to All then any directive which has the .htaccess files context is allowed in the .htaccess files. More about this directive here.
Require tests whether an authenticated user is authorized according to a particular provider and the specified restrictions.
When set to all granted, then access is allowed unconditionally.
3-Create .htaccess files
The .htaccess is the file which will contain all the directives, we need to use to do the work.
This file has to be created in your website directory content.
To do this type :
$ sudo nano /var/www/toto/.htaccess |
You also can use vim, if you know it.
In the console editor screen, the first line that should always be written for our rewrite rules to work is:
RewriteEngine on |
That directive activates the RewriteEngine.
Next, paste this:
RewriteBase / |
Save the file using Ctrl + x, then y and press Enter.
And your done.
Of course, you should have an index.html in /var/www/toto directory.
If it is not, type:
$ sudo nano /var/www/toto/index.html |
html> |
Now if you visit any pages which are not in your website or web application, you will be redirected directly to the index.html page.
Try http://ipaddress/titi. You should see the above html page.
4-Go deeper, RewriteRule and RewriteCond directives.
Let’s get into the basics of the directives.
1-RewriteRule Basics
A RewriteRule is composed of 3 arguments separated by space.
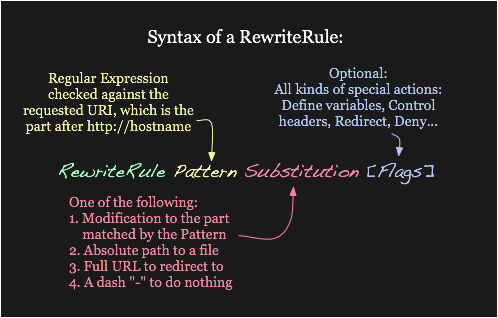
A substitution can itself be one of three things:
- A full filesystem path to a resource
- A web-path to a resource
- An absolute URL
The last part is about the flags. They are optional and present to modify the behavior of a rule. See the Rewrite Flags document.
2-RewriteCondition Basics
A rewrite condition, written RewriteCond is used to restrict the types of request that will be subject to the following RewriteRule.
When more than one RewriteCond is specified, they must all match for the RewriteRule to be applied.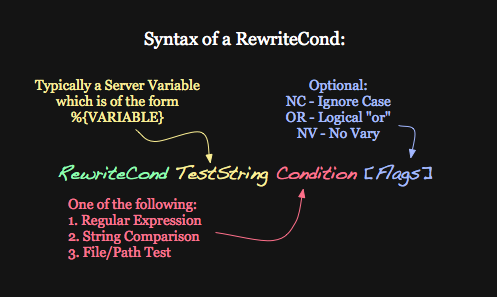
Conclusion
In this guide, we created simple rules to redirect to the index.html any user trying to access to a “Not Found” page.
And I explained how the RewriteRule and RewriteCond works.
Stay tuned for my next article!